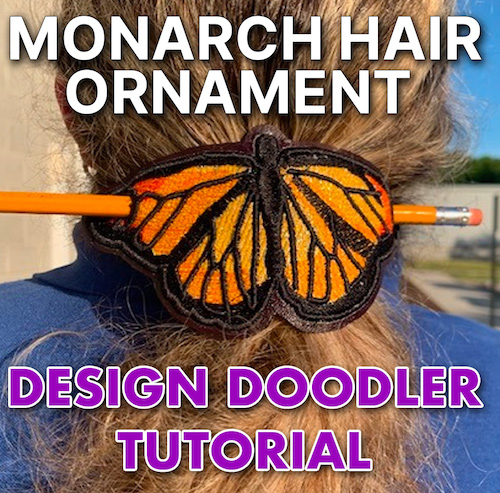
Welcome to our Design Doodler’s creative playground! We’ll walk you through creating a stunning monarch ponytail holder with step-by-step tips and tricks to help you master the Design Doodler’s features and bring your butterfly design to life.

This project is perfect for adding a touch of elegance to any hairstyle and is suitable for beginners and experienced embroiderers. With our easy-to-follow instructions, you’ll learn how to design, stitch, and assemble a butterfly ornament that’s sure to turn heads.
Ready to add a flutter of beauty to your style? Gather your materials, fire up your Design Doodler, and let’s create some embroidery magic!
Material List:
- Design Doodler or other embroidery software
- One 4×8-inch piece of vinyl
- One 4×8 piece of holographic gold mylar (available as gift basket filler at dollar stores)
- Medium-weight tear-away stabilizer
- Embroidery thread
- One 3×7 inch piece of PUFF STUFF, the terrific puffy foam alternative
- One 4×8 piece of felt
- One 4×8 piece of Heat and Bond or other heat bonding material
Monarch Ponytail Holder Tutorial:
Step 1: Insert artwork into your Design Doodler and resize to a width of 7 inches.

Step 2: Using a black running stitch, digitize around the butterfly, including the head.

Step 3: Using a tatami fill stitch with a density of 1.2 mm (.047 inches), select travel on edge.
Here’s how to do it:
- Choose drawing tool from basic widget
- Select the Filled shape (looks like a kidney bean)
- Choose how you want to draw it (squiggly free form line)
- Start drawing

4. Change the density of a filled object

Step 4: Digitize the overall butterfly image with your lightest color.

Step 5: Digitize the medium color highlights.

Step 6: Digitize the dark color highlights.

Step 7: Digitize the tatami border and large black areas on the wings.

Step 8: Digitize the body and veins using a satin stitch.


Step 9: Digitize satin circles for a stick or pencil to be inserted.

Step 10: Digitize a satin border around the butterfly.

Step 11: You’re done!
Embroidering Your Butterfly:
Step 1: Hoop a piece of medium-weight tear-away stabilizer.
Step 2: Place in your embroidery machine and stitch out the placement line.

Step 3: Remove the hoop from the machine and, using temporary adhesive spray, place the vinyl over the placement line (you can use small pieces of painters tape at the sides to ensure the fabric is held securely in place).

Step 4: Place the holographic mylar on the vinyl (painters tape also helps to hold this in place).

Step 5: Return the hoop to the machine and stitch through the light orange background.

Step 6: Remove the excess mylar.

Step 7: Stitch through the black tatami background for the veins and body.
Step 8: Remove the hoop from the machine and place the PUFF STUFF over the stitching area.

Step 9: Return the hoop to the machine and stitch through the end of the design.
Step 10: Remove the puff stuff from the machine and trim it, saving all of the trimmings in a Ziploc bag (they can be used for a later project).

Step 11: Run your stitching under hot water and remove the remains of the gel with a soft toothbrush.

Step 12: Place on a flat surface to dry.

Putting Your Butterfly Ponytail Holder Together:

Step 1: Trim a piece of Heat and Bond or other bonding agent to a piece of black felt.
Step 2: Peel the paper away and apply it to the back of your butterfly.
Step 3: Bond the pieces together.
Step 4: Trim your butterfly design.

Step 5: Punch holes in the circles using a hole punch or die tool.

Step 6: Insert a stick or pencil and wear over a ponytail!

The Design Doodler is a fun, powerful tool that brings your creative ideas to life. This butterfly ornament is just the beginning! We encourage you to experiment with different designs, colors, and techniques to make each project uniquely yours.
P.S. Don’t yet have the Design Doodler? Try a free demo of the Design Doodler today and discover the endless possibilities for your embroidery projects.

Leave A Comment