Do you have unused fabric laying around or an old tablecloth you’re unsure what to do with? We’ve all been there. Your fabric stash has piled up and your partner has been nagging you to clear up some space.
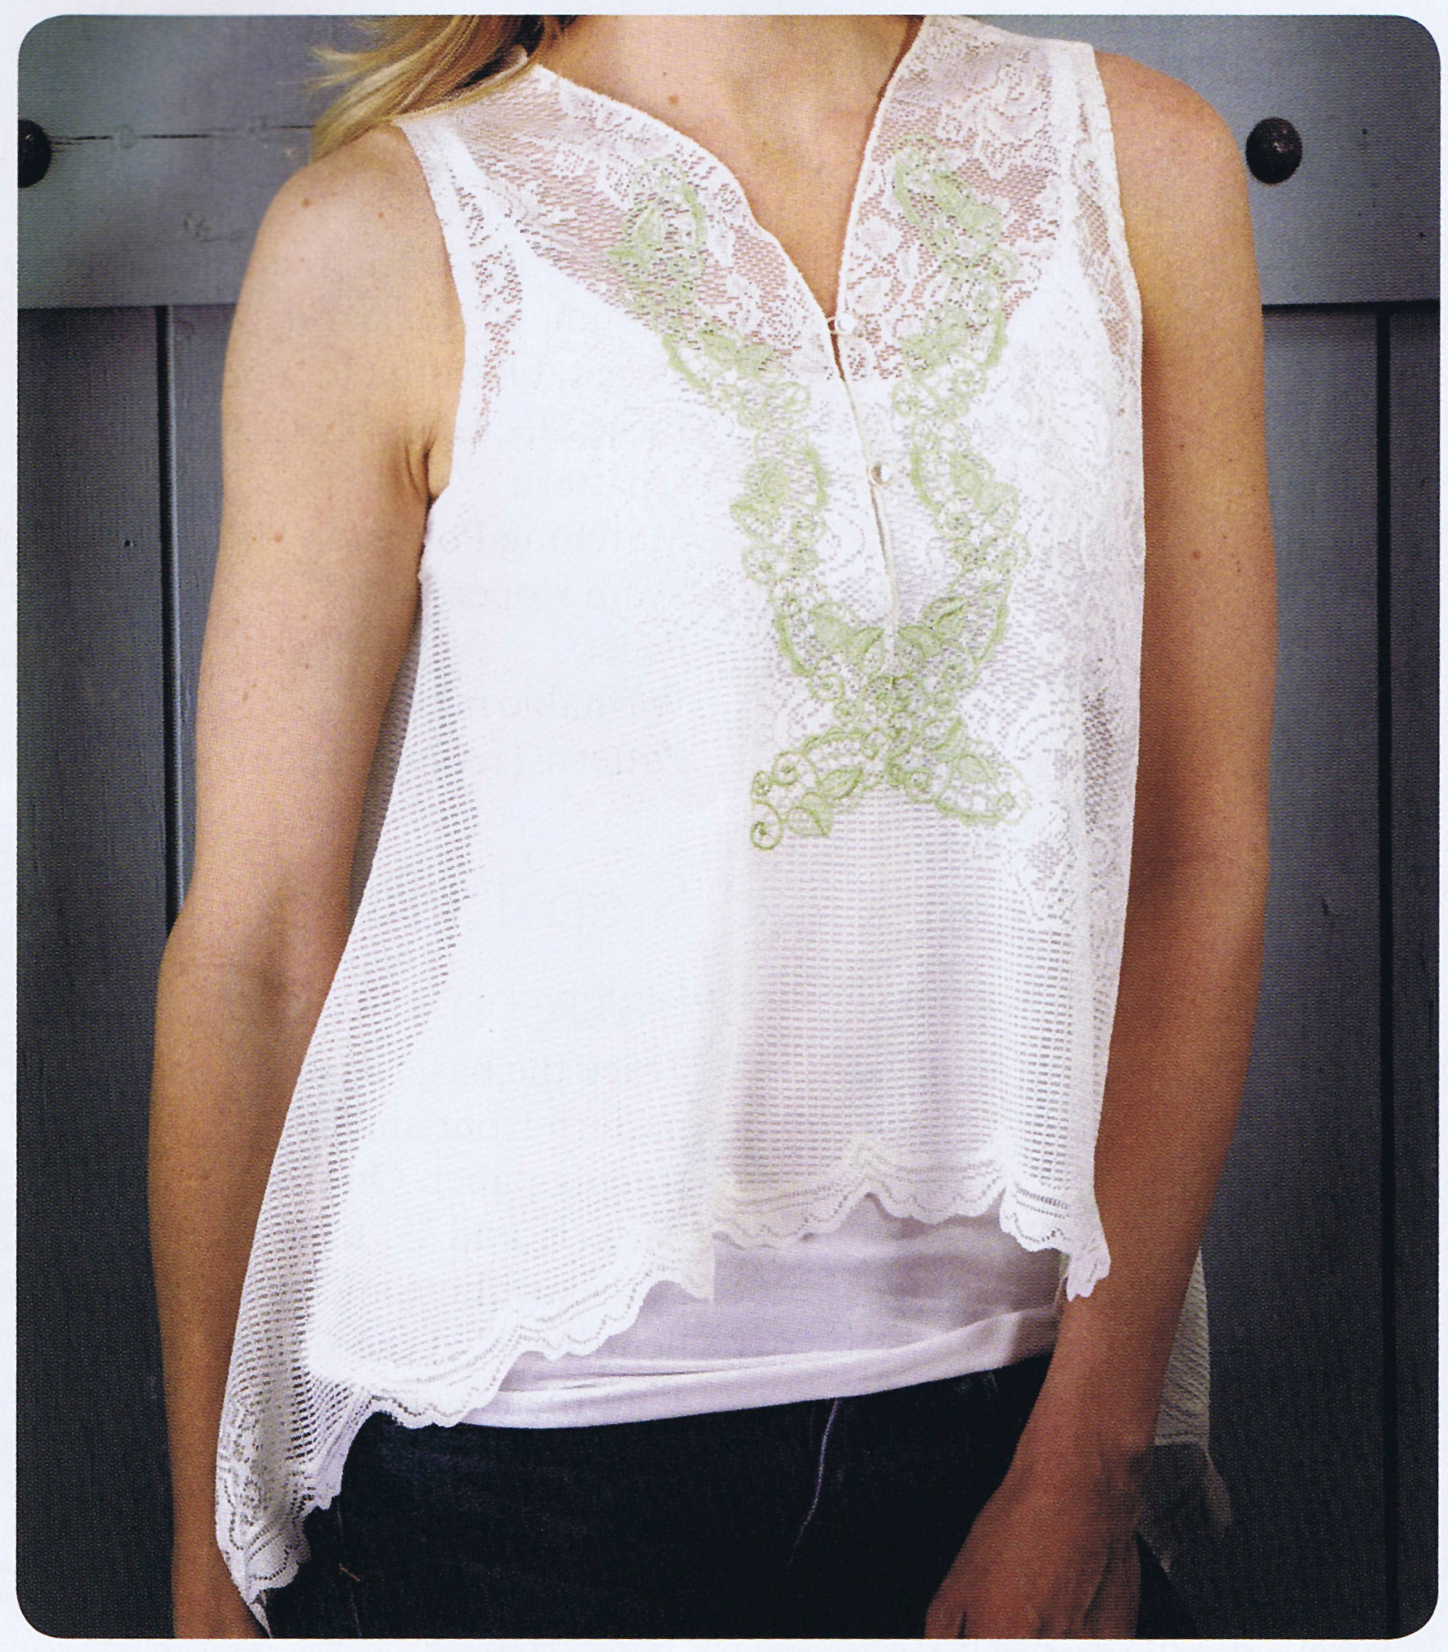
You don’t want to throw anything out because, well, who doesn’t love having a fabric stash? To make both of you happy, why not recycle some of that fabric while also spicing up your wardrobe! You can create and embroider this gorgeous lace blouse by following the steps outlined in this project tutorial.

Expand your embroidery world and have fun doing it with our new & improved Fun Effects Embroidery Course by learning 14 popular techniques, including applique, to skyrocket your creative potential.
Why embroider this lace pullover blouse?
Creating this project is very budget-friendly as you can use materials from around your home. You can use fabric from your fabric stash (if you have to) or make your blouse super unique by using a tablecloth. You can use any tablecloth you have lying around, or you can use a family lace tablecloth; this can preserve the memories that go with them. Often lace tablecloths have been in the family for many years and are buried in a drawer (I’m not sure how long mine have been in there), but we tend not to want to part with them. Making a blouse can be a great functional way to use your tablecloths and get some use of them if they’ve been stored away. Sometimes using different materials when embroidering can be challenging; check out the 3 main fabric categories used in machine embroidery and how to use them.
Now if you really want your blouse to stand out and be impressive, add some soft lace embroidery down the front. Changing the embroidery lace designs you use, the color of lace thread you use, or simply rotating the same lace design here and there, will help give a different look to each embroidered blouse you create to make a new clothing masterpiece. Using lace can seem intimidating, but you’ll wonder why you ever held yourself back once you’ve embroidered it correctly. To help, check out our freestanding lace tips and tricks so you can get the best possible results.
P.S. Want stunning freestanding lace designs that demand attention and showcase your sophisticated side? Check out our authentic 1950s vintage freestanding lace designs.
Wearing this embroidered blouse with a tank top under it gives your outfit an elegance element for any occasion. It is easy to customize your lace blouse to suit your taste. Not only can you make it stylish and add the right amount of flair, but you can also make it one of a kind. You won’t be seeing anyone around town wearing the same thing.
As you’re creating this embroidered lace top yourself, you don’t have to try on shirts or worry about getting the right size. You can assure you’re getting what you want and at the right fit.
Alright, I’ve talked enough about how amazing this blouse is going to be/look on you, so let’s get embroidering!
Supplies required for creating your embroidered lace blouse:
Machine embroidery lace used for the blouse:
If you haven’t tried our freestanding embroidery lace, download our Embroidery Legacy Design Kit for a free lace design (as well as 10 other fan-favorite designs!)
Materials used for the embroidered blouse:
- Water-soluble stabilizer
- Vellum or transparency paper
- Lace tablecloth 60″ x 84″
- Basic sleeveless shell blouse pattern
- Matching polyester thread
- Seam ripper
- Ruler
- Washable marker
- Pattern tracing paper
- Editing embroidery software – try a free 30-day trial of Hatch Embroidery Software
Embroidered blouse project tutorial:
Step 1: Prepare your machine embroidery lace pattern
- Trace the basic shell blouse pattern front and back on pattern tracing paper.
- On the new pattern, add 1/2″ to the side seams at the armhole and extend the hemline 5″ at the side seam.
- Add 1″ at the new bottom side seam.

- Connect the armhole mark and the button side seam mark, creating a new angled side seam.
- Draw an arch from the bottom side seam to the center on both the front and back pattern pieces.
- Draw a line marking the center back and center front

- Cut the tablecloth in half, creating two 60″ x 42″ pieces.
- Cut the back from one of the halves.
- Mark a line down the center of the remaining tablecloth section with a removable marker.
- Lay the tablecloth on the blouse front pattern. Transfer the pattern outline and center front line on the table cloth with a removal marker.
Step 2: Create a machine embroidery lace design template
- Open design AIMR44A from Vintage Lace Edition 4 Volume 6 design pack in embroidery editing software.
- New to embroidery or looking to upgrade your software? Try our free 30 day Hatch embroidery software trial.
- Copy, paste, mirror image, and move the design, so the two designs are positioned side by side with a 1/2″ space between them.
- Merge design AIMR44 and position it below the existing designs. Save the design.

Step 3: Print & placement of embroidery lace template
- Print a template of the design on vellum or transparency paper.
- Position the top of the printed design 1″ below the front neck edge.
- Note: Because lace is sheer, the printout can be placed under the tablecloth to help with the design’s positioning.


Step 4: Hooping machine embroidery lace design
- Transfer the template’s crosshair on the lace front.
- Hoop water-soluble stabilizer with the tablecloth.
- Stitch the design.

Step 5: Sewing your embroidered lace top together
- Remove it from the hoop but do not remove the water-soluble stabilizer as it will continue to stabilize the fabric while you continue constructing the blouse.
- Verify the embroidery is centered on the front.
- If necessary, lay the front pattern piece on the front, make any adjustments, and redraw the front.
- Cut out the front.
- Sew the front and back together at the shoulder seams and the side seams.
- Press.
- Slit the center front open from the neckline to within 1″ of the embroidered design.
- Finish the neckline, center front slit, armholes, and the bottom.
- Suggestions for finishing the edges: serged rolled hem, sew the edge of lace along the edges or turn under and topstitch. Soak the top in water with some liquid fabric softener to dissolve the stabilizer, rinse, hand wash, and dry.
- Voila!

Conclusion: create your lace blouse
Not only can you create your lace blouse with materials from around your home, making this project budget-friendly, but you also can personalize your lace blouse to what best suits your style. Whether that be with different fabrics, lace thread colors, or lace embroidery designs. There is no limit to what you can create, making your embroidered lace top one of a kind.
This tutorial was written in a collaboration with Designs in Machine Embroidery (DIME) for their Volume 84 issue.
P.S. If you want to give your embroidered blouse a different look, browse through our giant collection of machine-friendly embroidery designs, and if you want to learn the secrets, tips & tricks behind the most popular embroidery techniques and have fun doing it with our new & improved Fun Effects Embroidery Course.
Happy stitching!

Leave A Comment